

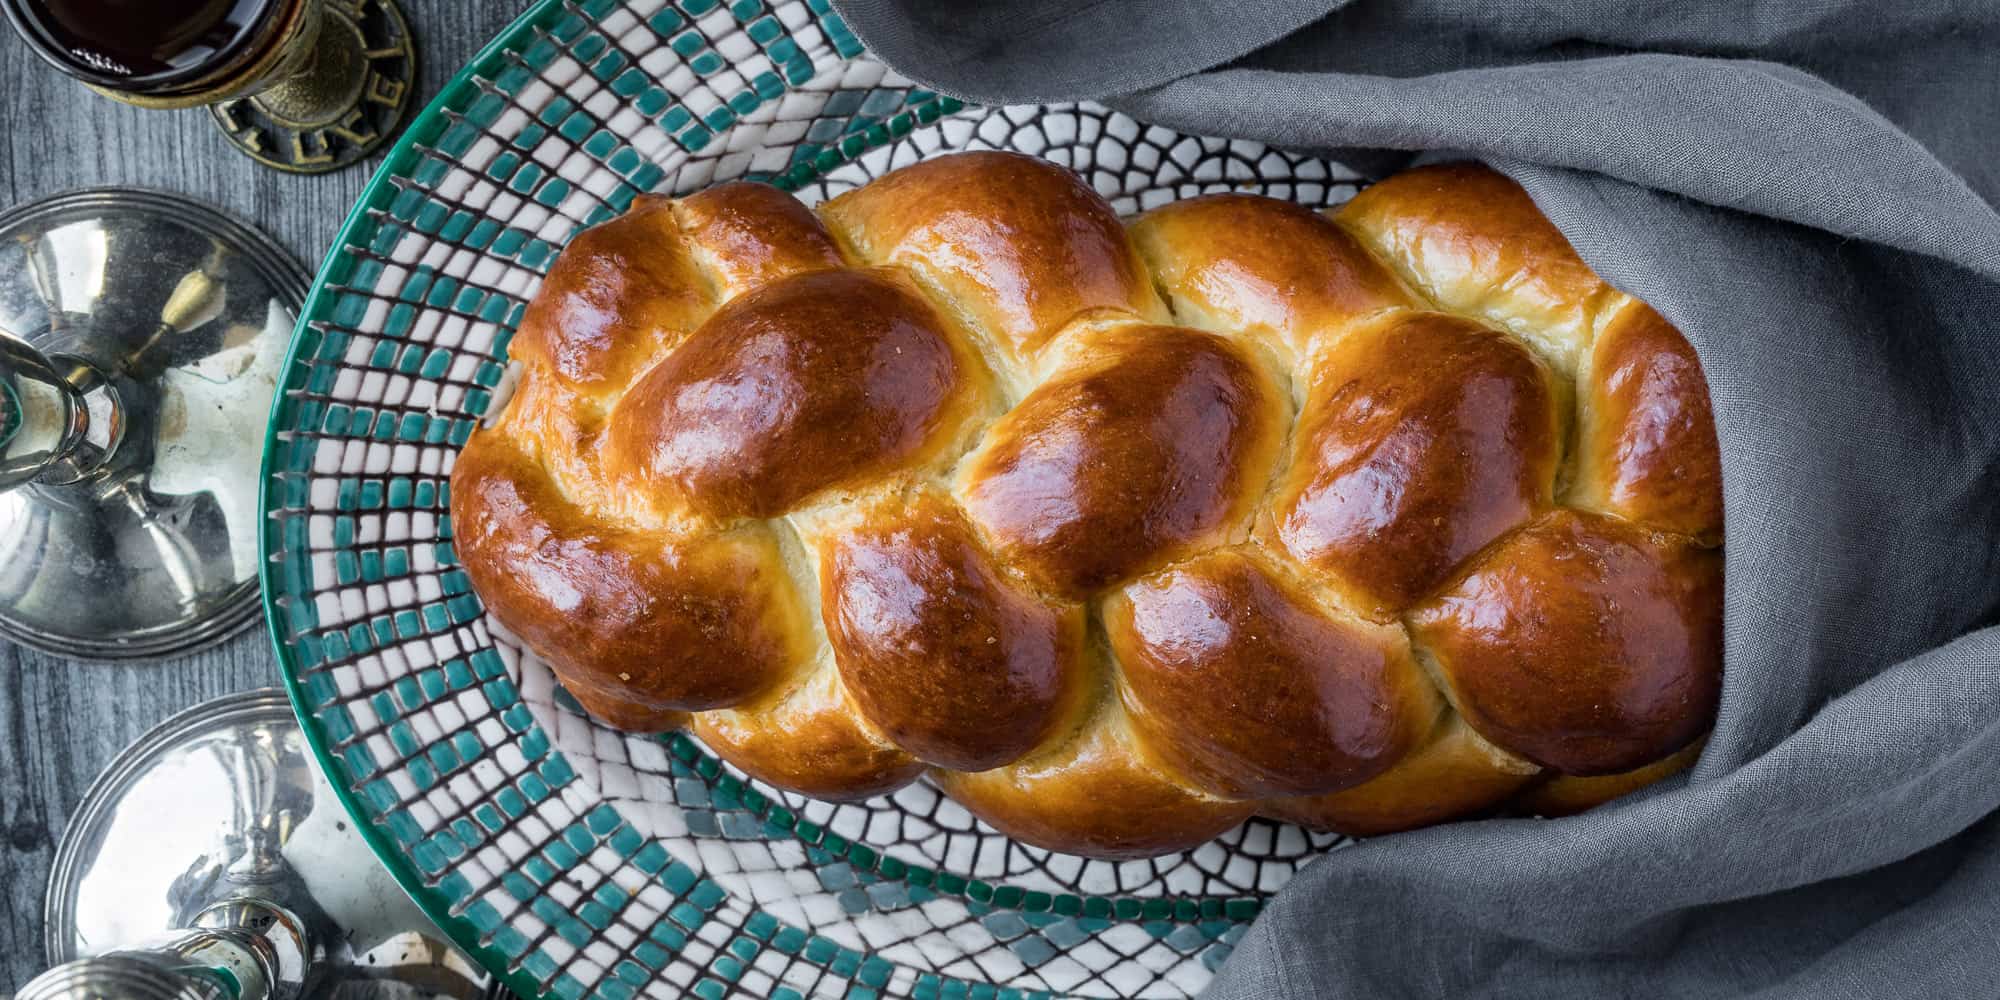
Normally I wouldn’t think of a loaf of bread as a potluck dish, but challah isn’t just any loaf of bread: a slightly sweetened egg (even sometimes eggless) bread that’s usually braided or sometimes formed into a decorative shape to mark a special occasion. it’s a Jewish specialty that is usually the centerpiece of a Friday-night Shabbat dinner. But challah has made its way far outside of Jewish homes, often the preferred base for decadent French toast. There are myriad challah recipes out there, yielding different consistencies, flavors, and shapes. This recipe yields a loaf that is my personal favorite: just the right balance of soft, fluffy, chewy, and crusty, with so much great flavor that you could eat it without anything else and be satisfied.
This post is longer than normal, but don’t be daunted! Challah is both simple and complex. It’s easy as anything to make a decent challah: first-time bakers can usually be successful. But to get a truly special loaf requires some attention and craft. I’ve tried to make the recipe as specific as possible, but here are a few things to keep in mind:
Flour
Type of flour: A good-quality bread flour is ideal for strong dough. I personally use this one. If you don’t have bread flour, you can use all-purpose flour (do not use a “self-rising” version).
Amount of flour: The key to a soft loaf that isn’t dense is to use as little flour as possible. I start with 930 grams of flour and add up to 70 more grams based on what the dough needs. The amount of liquid in the dough will vary from loaf to loaf because “large” eggs are similar but not uniform in volume. Besides that, kitchen humidity on the day you’re baking can also play a part. The bottom line is that you should use as little flour as you need to: add just enough flour so that when the dough is strong enough, it’s tacky but releases cleanly from your hands. If the dough easily tears and sticks to your hand, it needs a little more flour. (Pro tip: use the windowpane test, described in the recipe steps, to check your dough strength.)
Fats and sweeteners
Butter or oil: Some challah recipes call for oil, some for butter. Mine uses butter, which gives a little richer taste. But if you want to use oil, the results are pretty similar.
Honey or sugar: Most often, challah has a subtle sweetness to it. Some people achieve it with granulated white sugar, some people with honey, some people with something else. I use honey, but you can substitute an equal amount of sugar if you prefer.
Eggs
How many eggs? Challah recipes are all over the map on this question, from no eggs at all to just yolks, and a lot of ’em. I like four whole eggs plus two yolks.
Yeast and rising
Instant or active dry yeast? I grew up with active dry yeast, so initially that was all I used. But a lot of people these days are more likely to have instant yeast on hand, so I developed the recipe for instant yeast. However, I don’t care for an overly yeasty taste, so I dialed down the amount quite a bit. The result is a longer rising time, but the side benefit is more flavor development time. (And hey, if you like a yeasty flavor, then just add a little more yeast — see the note in the recipe — and you can not only have that yeasty flavor but also cut the rising time basically in half.)
Initial rising time: You simply have to give the dough the time it needs to rise. An ideal environment is a draft-free place that’s about 80-100°F. If your kitchen doesn’t have a good place like that (hint: hot air rises, so somewhere up high might be a good idea), some ovens have a “bread proof” setting that sets the oven to about 100°. Or if it doesn’t, you can turn the oven on for a few minutes, then turn it off and let the residual heat do its job. Because of the lower amount of instant yeast I use, the initial rising time can be 3 hours. (Recipes with more yeast cut the rising time basically in half.)
Refrigerated rising? Some people like the convenience of starting a day ahead. If you’re in this camp, you can set the dough to rise in the refrigerator. Because refrigeration dramatically slows the rising, the dough will stay at its peak rise longer before becoming overproofed. The downside: refrigerated dough takes a long time to come to room temperature, which especially affects its final rise. The finished result is good, though I find the bumps of the braid are less pronounced.
Side note: two or three rises? Some challah recipes (like this one) instruct you to gently deflate the dough (misleadingly called “punching down” the dough) and let it rise for a second time before shaping. Challah bakers these days often skip this step, preferring to save time. So you can skip it if you like, but I think it’s worth the extra time and minimal effort. It’s the difference between a great challah and an amazing challah, with a higher oven rise, a little deeper flavor, and a little fluffier crumb.
Final rise: Paying attention to what the dough needs is particularly critical for the final rise, after you’ve shaped the loaf. A properly risen braided dough will get its maximum height and airiness and won’t have its strands pull (too far) apart during baking.
Shaping and baking
Shaping: there are countless ways to shape dough into a loaf. Most often with challah it’s a braid. I give instructions for braiding with six strands, but it’s worth looking around the web for different methods and inspiration. You can go simple and break the dough into the number of pieces you need and just roll out your ropes without doing anything special. That often leads to uneven ropes of varying lengths, resulting in somewhat haphazard braids. But in this recipe I give you a foolproof method that requires a little more effort but will help you create evenly shaped ropes that are consistent with each other, leading to gorgeous braids. (Hint: have a kitchen scale and rolling pin handy.)
Egg wash: Challah gets its signature sheen from an egg wash (or alternative). As with everything else challah, there are many approaches. Mine calls for one whole egg whisked with a teaspoon of water, brushed on once just before baking.
Baking and doneness temperatures: Many challah recipes call for the braided loaf to be baked at 350°F, some at 375°F, a few at 325°F. I’ve settled on 350°. The one thing pretty much everyone agrees on is the bread is done when an instant-read thermometer, inserted into the middle of the loaf, registers about 190–200°F. Try not to let the loaf go too far over that — no one likes a dry challah.
After the bake: while it’s tempting to tear right into it after it comes out of the oven, it’s important to let it cool nearly all the way on a rack as it finishes its internal work. It’s the final step in learning the patience of an experienced bread baker.
Final notes
1. There are so many visual aspects to getting the techniques right. I will be updating this recipe with photos and videos that show everything in more detail.
2. If you’ve read this far, you are a super trouper and are well on your way to challah mastery. But don’t worry about getting shaping just right with your first or even fifth or tenth loaf. No matter its shape, if you follow this recipe you’ll have an absolutely delicious challah that anyone will be excited to taste.
(UPDATE FEBRUARY 2022: I’ve updated this recipe, doubling the ingredients to make two standard-sized loaves. I’ve also converted most of the ingredients to metric weights, which is better for more accurate breadmaking.)
Ingredients
Dough
- 240 g warm water (105-115°)
- 13 g instant yeast see note about yeast quantity and type
- 125 g vegetable oil see note about substituting butter
- 165 g honey
- 28 g salt
- 6 large eggs
- 1000 g bread flour can substitute all-purpose flour
- toppings (optional) poppy seeds, sesame seeds, everything bagel topping, etc.
Egg wash
- 1 large egg
Instructions
Mixing the dough
- Combine warm (105-115°) water with yeast in a medium bowl. Set aside for five minutes.
- Add oil and honey and stir to combine.
- Beat 4 whole eggs plus 2 egg yolks in a separate bowl (discard or save the leftover egg whites for another purpose).
- Add the eggs and salt to the liquid mixture and stir to combine completely.
Kneading the dough with a stand mixer
- Add 930g of the flour to the bowl of the mixer, then add the liquid mixture to the flour. Reserve the remaining 70g flour. Attach the dough hook and lock the mixer head in the down position. Start the mixer on its lowest speed to combine the ingredients.
- Once all the flour has been incorporated, increase the mixer speed to medium-low to knead and run it for about 7-8 minutes. If you see a lot of dough sticking to the sides, add in 1 tbsp of the reserved flour and let it become fully incorporated. You may need to do this 3 or 4 more times during this step.
- After 8 minutes, stop the mixer and use a flexible dough scraper (silicone spatula is fine too) to scrape down the sides of the bowl. The dough should be tacky but not impossibly sticky at this point; if it is impossibly sticky (i.e., you can't rub your hands together and get the dough completely off your fingers), add another tbsp of the reserved flour to the bowl and knead another minute or two.
- Test the dough strength with the windowpane test: tear off a chunk of dough approximately 2 tbsp in size. Hold the piece of dough up to a window or light, and, using your fingers, pinch and stretch the dough into as thin and flat a shape as you can. If you can stretch the dough so that light comes through the dough without the dough tearing, the dough is ready for its first rise. If the windowpane tears, return the dough to the ball and knead for another minute or two and test again. Note: the dough probably doesn't need any more flour at this point, just more kneading.
- Depending on the size of your mixer, you may find as the dough nears completion, it may start creeping over the top of the dough hook. If that's the case, it's best to pull it out of the mixer and complete by hand. Use the dough scraper to release the dough from the bowl and hook and transfer to countertop to knead by hand. The dough may seem very sticky coming out of the bowl, but use the dough scraper to release the dough from the countertop, adding a little flour only when absolutely necessary. As you knead by hand, some dough may stick to the countertop as you pick up the dough and rotate it. If it's a very small amount of dough, scrape it up with the dough scraper and continue kneading. If a lot of dough is staying on the countertop, add 1 tbsp of the reserved flour and knead it in. The dough will become less sticky as it gains strength.
- Once the dough passes the windowpane test and is not overly sticky, skip to "Rising the dough" below.
Kneading the dough by hand
- Add 930g flour to a large mixing bowl, then add the liquid mixture and stir with a mixing spoon or dough whisk to mix thoroughly. Reserve the remaining 70g flour.
- It can be easier to start the kneading right in the bowl, but you can also turn out the mixture onto a countertop dusted with 1 tbsp of the reserved flour. Your goal is to use as little of the reserved flour as possible. The dough will become less sticky on its own as it gains strength.
- Kneading technique: Gather into a ball and flatten. Pull the top of the flattened ball and fold over the bottom, then use the heel of your hand to seal the fold. Pick up the dough, turn it 90 degrees, and repeat the process. If it's too difficult to pick up the dough cleanly from the counter with your hands, use a flexible plastic dough scraper to pick it up, and sprinkle 1 tbsp of the reserved flour in the bowl or on the countertop, and return the dough and knead until incorporated. Knead for about 8-10 minutes.
- At this point the dough should be tacky but not impossibly sticky — you should be able to rub your hands together and get all the dough off cleanly. If not, add 1 tbsp of the reserved flour and knead another 1-2 minutes.
- Test the dough strength with the windowpane test: tear off a chunk of dough approximately 2 tbsp in size. Hold the piece of dough up to a window or light, and, using your fingers, pinch and stretch the dough into as thin and flat a shape as you can. If you can stretch the dough so that light comes through the dough without the dough tearing, the dough is ready for its first rise (skip to "Rising the dough" below). If the windowpane tears, return the dough to the ball and knead for another minute or two and test again. Note: the dough probably doesn't need any more flour at this point, just more kneading.
Rising the dough
- Oil a large mixing bowl or food-safe tub (with a tight-fitting lid).
- Form the dough into a tight ball, pulling gently down at the sides so that the dough is taut, and pinch underneath to seal.
- Place the ball of dough in the bowl or tub, turning to coat all sides in the oil, then cover (for a bowl, use plastic wrap or a kitchen towel; for a food-safe tub, use the tight-fitting lid).
- Set aside in a warm (80-100°F), draft-free spot and let rise until doubled in size. Because of the lower amount of yeast compared to other recipes, the first rise will likely take significantly longer than other recipes might indicate (see note about yeast types and rising times). In a spot that's about 80°, the first rise can take about 2.5-3 hours. A spot that's closer to 90-100° will rise more quickly. Don't put the dough in an environment hotter than that.
- When the dough has completed its first rise, take the dough out of the bowl or tub (it probably will not come out completely cleanly; that's a good thing, just scrape it all together) and deflate it, reshaping into a tight ball as before and returning to the bowl or tub and cover for its second rise, which should take about 1/3 the time of the initial rise. When the dough has once again doubled in volume, the second rise is done. (Note: many bakers opt to skip this step, but I find the difference in quality to be worth the extra time and tiny effort.)
Shaping
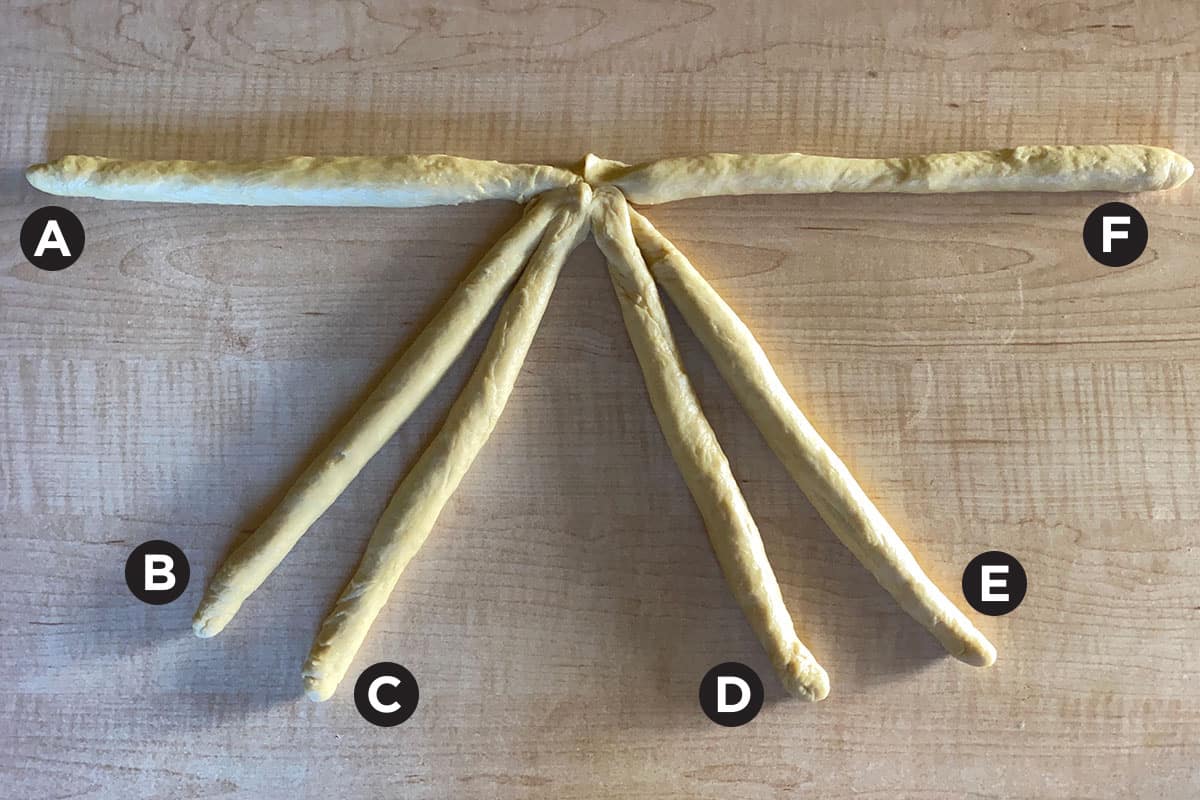
- Challah is known for being a braided loaf. There are countless ways to braid a loaf; in this recipe I'll explain how to create the six-strand braid seen in the photo.
- Have a kitchen scale, dough scraper, and rolling pin on hand. Line two half-sheet pans with one piece of parchment or a silicone baking mat each. It's best to bake each loaf individually for the deepest color and an even doneness.
- Weigh the completed dough, which should be approximately 1800g. Divide in half and set aside one of the halves (each half makes one challah).
- Working the first half, divide the dough into six equal pieces. Use the kitchen scale to measure precisely (tip: weigh in grams for easier math). It's perfectly ok to tear off little chunks to move between pieces to achieve pieces of equal weight. Once you've separated the dough into six equal pieces, form each into a tight ball, again stretching the sides down and pinching on the bottom.
- Making the ropes: Start with the first of the six balls you created, flip it over so the bottom of the ball is showing, and flatten the ball evenly on the countertop. You should not need any additional flour at this point — if your dough passed the windowpane test earlier, it should be strong enough to release from the countertop easily but also stick just enough to do the work you need to do.Using the rolling pin and starting from the center, roll up and down until you have a very flat (1/4" thick) elongated oval. Use the heel of your hand to flatten the corners so if forms an evenly flat rectangle.Roll the rectangle tightly up on the long side to form a cigar shape. Roll the rope back and forth, pressing a little heavier on each end until you have a long, even rope about 1 inch/3cm thick with tapered ends. Pinch the seam shut, roll the rope a few more times to help the seal tighten, and set the rope aside, seam side down, while you complete the remaining ropes.
- Once all the ropes are done, the first ones will likely have contracted and thickened a little, and the seam may have reopened. Just pinch it shut again. Gently roll the ropes to lengthen them out again and make them even with each other, approximately an inch in diameter and 15 inches long. It's important to roll gently but assertively—you don't want to rip the strands of gluten. Finish each rope by tapering about an inch on each end even more, to about 1/4" diameter.
- Creating a six-strand braid: Clear a large countertop or work surface. Arrange the ropes, seam side down, like the diagram here, where it looks like a stick figure with no head, two arms, and four legs. Pinch all ropes together at the top middle spot. Keep the seam sides down as you do the braid.Take the left arm (A) and swing it down just to the left of the inside right leg (D). This rope becomes the new D. Now move the outside right leg (E) up to become the new right arm (A). Repeat on the left: bring the right arm (F) down just to the left of the inside left leg (C). This is now the new C. Move the outside left leg (B) up to become the new right arm (F). Repeat, starting with A as before. When you can't braid further, pinch the bottom ends tightly together and tuck underneath the loaf. The top ends were already pinched when you began. Pinch again and tuck underneath the loaf, pinching underneath to seal the tucked end to the underside.
- Move the finished loaf to one of the parchment-lined half-sheet pans and cover with plastic wrap.
- Wait 10-15 minutes, then shape the second loaf and set aside on the second parchment-lined half-sheet pan and cover with plastic wrap.
Final rise
- Let rise in a warm, draft-free place until it has become large and puffy, about 50% larger in volume. Check the rise every 30 minutes or so. This may take two hours even in a warm kitchen with this recipe. It's important to complete this final rise; otherwise the braids may pull apart too much in baking. (But also don't overproof, which can lead to flatter finished results.) The more you do this, the better sense you'll have of how long this process takes in your kitchen and you can leave it alone longer.
- In the last half hour of the final rise, preheat the oven to 350°F.
- Make the egg wash: beat the remaining egg in a small dish along with 1 teaspoon of water until it has a very even consistency. Just before baking, brush the egg wash all over the loaf, making sure there are no dry spots. Save the egg wash, as you'll be reapplying it during the bake.
Baking and cooling
- Bake in the center of the oven for 15 minutes, then take out and apply another egg wash.
- Optional: at this point you can add toppings such as poppy seeds, sesame seeds, everything bagel seasoning, etc. Sprinkle over the loaf after the egg wash.
- Return to the oven and bake another 15-20 minutes, until the top is deeply golden and an instant-read thermometer registers 190-200° in the thickest part. Another way to check doneness is to flip the loaf over and thump it with the back of a spoon. If it makes a hollow sound, the loaf is probably ready to take out of the oven. Slide off the parchment onto a cooling rack and let cool for at least an hour. It doesn't need to be completely cool before you slice into it, but it does finish its baking during that first hour of cooling.
- After the bread is completely cool, you can store it in a plastic bag for 3-4 days. For the prettiest slices, slice diagonally across the bumps.
Notes
- If you prefer to work with packets of active dry yeast, adjust the first steps as follows: start with the water at about 105°-115°F, then stir in 2 packets of active dry yeast and let stand about five minutes. Once the yeast is actively blooming, add the honey, butter, salt, and eggs and proceed as before. The rising time will be faster than indicated in the recipe.
- If you want a faster rise with the instant yeast and don’t mind a yeastier taste, increase the amount of instant yeast to 16g. That should significantly speed up the rise, but there will be a distinctly yeasty taste to the final loaf.
- Start with room-temperature water instead of warm water. Don’t add the yeast yet, but instead add the honey to the water. No need to mix yet.
- Melt 155g of butter over low heat. Add the melted butter to the water and honey and mix thoroughly. Add the yeast and stir in. Proceed as directed in the recipe.

Comments
can you direct how to double or triple the recipe?
Great question! Our mixer has a hard time kneading the recipe when it’s doubled because this recipe uses relatively less flour than others, but the mixer can get the dough about 80% of the way, and then you can finish kneading by hand. Unless you have a larger mixer (ours is a 5-quart KitchenAid), you’d probably have to do a tripled recipe completely by hand. Let rise as directed and then divide the dough as desired.
Can you please give the ingredients in grams? Measuring flour, especially, can be quite variable!
I have now updated the recipe to list weights in grams for most ingredients. (I also doubled the recipe.) Enjoy!
First time making challah! Super easy recipe to follow! Next time I’ll re-read as I missed the bottom note on yeast , and I think it would have been fluffier (though it was already quite big and yummy). To challenge myself I will have to try to braid it with 4 or 6 strands!
Thank you so much, Berenice! I’m so glad the recipe worked well for you.
So I have asked about the substitution with oil ( on one of the challah FB pages)- and I want to make this recipe because it is not one of the resulting huge batches that people on FB make. One more question about the oil- again, sorry. You note 2 tablespoons of oil last. Am I to assume this is for greasing the bowl? Or is it an addition?
Yes, that’s for greasing the bowl. If you’re substituting oil for the butter, use a 1:1 substitution. BTW, doubling the recipe works perfectly if a one-loaf recipe is too small.
Could you please tell me the size of the cup you use in mls. Is it 250ml? And if possible, also the amount of flour in grams.
For fun I started weighing everything in grams just to see how consistent I was from week to week. I found I was being pretty consistent, so here are all the weights: 465g flour (plus about 25-35g extra flour as the dough was forming), 120g water, 83g honey, 225g eggs (mix of 2 whole eggs plus one yolk), 13g salt.
Hi again — I have now updated the recipe, both doubling it and listing key ingredients in metric weights. Enjoy!
I love this recipe and I would be glad to have it with metric measurements please.
Merci beaucoup.
I have now updated the recipe to list weights in grams for most ingredients. (I also doubled the recipe.) Enjoy!
Do have this recipe in cups, not grams?
Hi, Margaret — thanks for asking! The tricky thing about measuring flour in cups is that how one person adds flour to a measuring cup can be very different from another person, so the difference can be off by 30 grams or more. So I could tell you that the total amount of flour is a little over 8 cups, based on 120g/cup, but depending on how you scoop, measuring 8 cups could end up being more like 1200g, not the ~1000g I recommend. That would lead to an overly dense, dry challah. I strongly recommend using weight to measure the ingredients I specify in weight — it’s the easiest way to get a consistent result. I hope this helps!
What size bowl do you use tomix ingredients ! Thanks 🙏 Shabbat Shalom
I typically mix everything but the flour in a 4-cup measuring cup, then pour all that into my stand mixer bowl where the flour is already waiting. My mixer is a 5qt and works perfectly for this amount. When I double the recipe, the volume is just pushing the limit of my stand mixer bowl: as it gets close to finished, the dough starts creeping over the guard of the dough hook, so I have to keep an eye on it and usually finish kneading on the countertop. Hope that helps!
I have been making a few challahs a year for 25 years or so. I have never really measured out my ingredients, I’ve just done it by instinct. They are good and everyone who eats them really enjoys them. But I have always thought that I could do better. They have generally been denser than I’d like and pretty bland. I tried this recipe and my challah was delicious! It was fluffier and more flavorful than any challah that I had made before! I am really looking forward to making more using this recipe! Thanks a lot!
Thank you so much, Martin! I’m so happy you tried it out and it worked well for you.
Hello! I am going to make this tomorrow and my question is…doesn’t the second loaf get about an extra 30 mins rise while that first load is baking? Or am I missing something which Intend to do. Thanks!
Great question! It usually takes me about 15 minutes to make each braid, so really it’s an extra 15 minutes or so, not a deal-breaker in terms of extra rising time. If you’re really concerned about it, wait about 15 minutes after braiding the first one to braid the second one. Hope it all goes well for you!
Since Challah is historically a bread to accompany the Jewish Shabbat meal, and Kosher laws in Leviticus forbid milk and meat to be eaten together, the butter recipe could be used only if the accompanying meal was a “milk meal.”
If meat is being served, the oil substitution would be needed.
After the raising, but just before the braiding, a walnut-sized piece of dough is separated, and a special prayer said over it, acknowledging the completion of the mitzvah of making Challah.
At this time, personal prayers can be added in merit of the mitzvah. This small piece is burned in the oven.
There are several YouTube videos for assistance with learning how to braid.
I look forward to giving this recipe a try.
I’d enjoy “fluffier!”
I’m not leaving a rating, as I have yet to try this recipe.
Thanks, Ann — I’m not kosher, so I don’t worry about those things. But for those people who are kosher, I’ve included a note that an equivalent amount of oil can be substituted for the butter, and it’s just as good. Try it out with oil instead if you prefer!
Can you suggest how to proceed if you want to freeze the loaf before final rise and baking. I promised a friend to give him a loaf he can bake later.
THANKS MUCH!!
Hi, Ella! I have not frozen dough before. I have tried refrigerating the first rise before, and it was fine, although the bumps were not as pronounced. It takes an awfully long time for the dough to get back up to temperature to do the rising it needs to do. For freezing, I just did a little look around the web, and one person recommends freezing the baked challah rather than the pre-baked dough. Having had the experience I’ve had with refrigerated dough, it would take even longer for frozen dough to not only thaw but come up to the rising temp. The person recommended freezing the dough or baked loaf uncovered until solid, then placing in a freezer bag (you’d probably need a 2-gallon bag). One tip I would suggest for that is that once you put the dough in the bag, close it almost all the way, then insert a straw and suck the remaining air out of the bag before closing it up to get an almost fully vacuum-sealed effect. Please report back and let me know how it goes!
Thanks, I’ll get back to you.
I am used to measuring everything in cups and ounces not grams could you please give me the measure in cups a T. Or t. Or oz.
Hi, Evelyn! I had originally written the recipe that way, but there’s such a difference in how much flour gets used depending on how someone fills their measuring cup. But here are the measurements the way I used to do them:
6 2/3 c bread flour to start, with another 1/2 c to use as needed
1 1/2 sticks unsalted butter (or 12T vegetable oil)
1 c filtered water
1/2 c honey
3 t instant yeast
4 eggs plus 2 yolks (plus one more egg later for the egg wash)
3 t salt
Ahh that’s what I’m looking for. Measure in cups. Thanks.
I’m glad you find that helpful! But a note that different ways of filling a measuring cup (scoop and level vs. spoon and level) can make a big difference in how much flour ends up in the measuring cup, a difference of some 20-40 grams per cup. So after 6 cups, the variance can be quite large. Measuring by weight is the easiest way to get consistent results, and it’s so worth it — plus it’s even faster than scooping, so it’s a win-win!
This recipe calls for too much salt and not enough sweetness. I’d lower the salt by about 1/3, and double the sweetness. However, your philosophy on double-rising and minimizing the amount of flour added is spot on. Happy to share this with my family!
Thanks for trying it and passing it on with your own adjustments! Indeed, the balance of sweet and salt is a very individual taste, and there are some very sweet challahs out there, akin to King’s Hawaiian Rolls. There’s no one right way, just a matter of what you prefer. I just prefer a more subtle sweetness.
Can I make dough in bread machine?
Hi Michelle! I’ve never used a bread machine, so unfortunately I really don’t know. Sorry!
This was the best challah I’ve ever eaten, and I love challah and am not an experienced baker at all. I did the butter and honey version and used two packets of active dry yeast. First rise was two hours, second rise was also about two hours just for logistical reasons, last rise after shaping was maybe 1.5 hrs. It’s cold here, so I couldn’t do a good rise in the sun or anything. I tried a couple things. Heating up the oven then turning it off was a pain, just bc it either got too hot or not hot enough. I ended up finding a trick on Google – you just boil a pot of water, then put the boiling pot of water into the oven with the rising bread (keeping the oven off the whole time). Makes a nice warm humid atmosphere.
I could’ve taken them out of the oven earlier, but I couldn’t tell whether they sounded hollow. Turns out they did. Anyway, great recipe. It did take me a long time though. Oh and I think the braiding instructions have some errors – there’s a couple points where left and right are backwards.
So glad you love it — thank you so much for sharing those details. That’s a great tip about creating a good environment for proofing, thank you! And I will take a look at fixing the braiding instructions.
Instructions in notes are a little clunky for me when it comes to doing both of the substitution for active dry yeast, and also butter. I’m not sure of my order of operations.
Hi, Cordelia! My apologies — I’ll try to make both of those easier to incorporate. Thanks for letting me know!