Light, Fluffy, Perfectly Chewy Challah
Finally, all the tips and tricks you need to make a challah that's both light and fluffy and just the right amount of chewy.
Servings: 30 slices
Calories: 191kcal
Cost: $10
Ingredients
Dough
- 240 g warm water (105-115°)
- 13 g instant yeast see note about yeast quantity and type
- 125 g vegetable oil see note about substituting butter
- 165 g honey
- 28 g salt
- 6 large eggs
- 1000 g bread flour can substitute all-purpose flour
- toppings (optional) poppy seeds, sesame seeds, everything bagel topping, etc.
Egg wash
- 1 large egg
Instructions
Mixing the dough
- Combine warm (105-115°) water with yeast in a medium bowl. Set aside for five minutes.
- Add oil and honey and stir to combine.
- Beat 4 whole eggs plus 2 egg yolks in a separate bowl (discard or save the leftover egg whites for another purpose).
- Add the eggs and salt to the liquid mixture and stir to combine completely.
Kneading the dough with a stand mixer
- Add 930g of the flour to the bowl of the mixer, then add the liquid mixture to the flour. Reserve the remaining 70g flour. Attach the dough hook and lock the mixer head in the down position. Start the mixer on its lowest speed to combine the ingredients.
- Once all the flour has been incorporated, increase the mixer speed to medium-low to knead and run it for about 7-8 minutes. If you see a lot of dough sticking to the sides, add in 1 tbsp of the reserved flour and let it become fully incorporated. You may need to do this 3 or 4 more times during this step.
- After 8 minutes, stop the mixer and use a flexible dough scraper (silicone spatula is fine too) to scrape down the sides of the bowl. The dough should be tacky but not impossibly sticky at this point; if it is impossibly sticky (i.e., you can't rub your hands together and get the dough completely off your fingers), add another tbsp of the reserved flour to the bowl and knead another minute or two.
- Test the dough strength with the windowpane test: tear off a chunk of dough approximately 2 tbsp in size. Hold the piece of dough up to a window or light, and, using your fingers, pinch and stretch the dough into as thin and flat a shape as you can. If you can stretch the dough so that light comes through the dough without the dough tearing, the dough is ready for its first rise. If the windowpane tears, return the dough to the ball and knead for another minute or two and test again. Note: the dough probably doesn't need any more flour at this point, just more kneading.
- Depending on the size of your mixer, you may find as the dough nears completion, it may start creeping over the top of the dough hook. If that's the case, it's best to pull it out of the mixer and complete by hand. Use the dough scraper to release the dough from the bowl and hook and transfer to countertop to knead by hand. The dough may seem very sticky coming out of the bowl, but use the dough scraper to release the dough from the countertop, adding a little flour only when absolutely necessary. As you knead by hand, some dough may stick to the countertop as you pick up the dough and rotate it. If it's a very small amount of dough, scrape it up with the dough scraper and continue kneading. If a lot of dough is staying on the countertop, add 1 tbsp of the reserved flour and knead it in. The dough will become less sticky as it gains strength.
- Once the dough passes the windowpane test and is not overly sticky, skip to "Rising the dough" below.
Kneading the dough by hand
- Add 930g flour to a large mixing bowl, then add the liquid mixture and stir with a mixing spoon or dough whisk to mix thoroughly. Reserve the remaining 70g flour.
- It can be easier to start the kneading right in the bowl, but you can also turn out the mixture onto a countertop dusted with 1 tbsp of the reserved flour. Your goal is to use as little of the reserved flour as possible. The dough will become less sticky on its own as it gains strength.
- Kneading technique: Gather into a ball and flatten. Pull the top of the flattened ball and fold over the bottom, then use the heel of your hand to seal the fold. Pick up the dough, turn it 90 degrees, and repeat the process. If it's too difficult to pick up the dough cleanly from the counter with your hands, use a flexible plastic dough scraper to pick it up, and sprinkle 1 tbsp of the reserved flour in the bowl or on the countertop, and return the dough and knead until incorporated. Knead for about 8-10 minutes.
- At this point the dough should be tacky but not impossibly sticky — you should be able to rub your hands together and get all the dough off cleanly. If not, add 1 tbsp of the reserved flour and knead another 1-2 minutes.
- Test the dough strength with the windowpane test: tear off a chunk of dough approximately 2 tbsp in size. Hold the piece of dough up to a window or light, and, using your fingers, pinch and stretch the dough into as thin and flat a shape as you can. If you can stretch the dough so that light comes through the dough without the dough tearing, the dough is ready for its first rise (skip to "Rising the dough" below). If the windowpane tears, return the dough to the ball and knead for another minute or two and test again. Note: the dough probably doesn't need any more flour at this point, just more kneading.
Rising the dough
- Oil a large mixing bowl or food-safe tub (with a tight-fitting lid).
- Form the dough into a tight ball, pulling gently down at the sides so that the dough is taut, and pinch underneath to seal.
- Place the ball of dough in the bowl or tub, turning to coat all sides in the oil, then cover (for a bowl, use plastic wrap or a kitchen towel; for a food-safe tub, use the tight-fitting lid).
- Set aside in a warm (80-100°F), draft-free spot and let rise until doubled in size. Because of the lower amount of yeast compared to other recipes, the first rise will likely take significantly longer than other recipes might indicate (see note about yeast types and rising times). In a spot that's about 80°, the first rise can take about 2.5-3 hours. A spot that's closer to 90-100° will rise more quickly. Don't put the dough in an environment hotter than that.
- When the dough has completed its first rise, take the dough out of the bowl or tub (it probably will not come out completely cleanly; that's a good thing, just scrape it all together) and deflate it, reshaping into a tight ball as before and returning to the bowl or tub and cover for its second rise, which should take about 1/3 the time of the initial rise. When the dough has once again doubled in volume, the second rise is done. (Note: many bakers opt to skip this step, but I find the difference in quality to be worth the extra time and tiny effort.)
Shaping
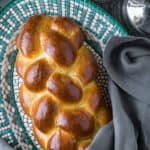
- Challah is known for being a braided loaf. There are countless ways to braid a loaf; in this recipe I'll explain how to create the six-strand braid seen in the photo.
- Have a kitchen scale, dough scraper, and rolling pin on hand. Line two half-sheet pans with one piece of parchment or a silicone baking mat each. It's best to bake each loaf individually for the deepest color and an even doneness.
- Weigh the completed dough, which should be approximately 1800g. Divide in half and set aside one of the halves (each half makes one challah).
- Working the first half, divide the dough into six equal pieces. Use the kitchen scale to measure precisely (tip: weigh in grams for easier math). It's perfectly ok to tear off little chunks to move between pieces to achieve pieces of equal weight. Once you've separated the dough into six equal pieces, form each into a tight ball, again stretching the sides down and pinching on the bottom.
- Making the ropes: Start with the first of the six balls you created, flip it over so the bottom of the ball is showing, and flatten the ball evenly on the countertop. You should not need any additional flour at this point — if your dough passed the windowpane test earlier, it should be strong enough to release from the countertop easily but also stick just enough to do the work you need to do.Using the rolling pin and starting from the center, roll up and down until you have a very flat (1/4" thick) elongated oval. Use the heel of your hand to flatten the corners so if forms an evenly flat rectangle.Roll the rectangle tightly up on the long side to form a cigar shape. Roll the rope back and forth, pressing a little heavier on each end until you have a long, even rope about 1 inch/3cm thick with tapered ends. Pinch the seam shut, roll the rope a few more times to help the seal tighten, and set the rope aside, seam side down, while you complete the remaining ropes.
- Once all the ropes are done, the first ones will likely have contracted and thickened a little, and the seam may have reopened. Just pinch it shut again. Gently roll the ropes to lengthen them out again and make them even with each other, approximately an inch in diameter and 15 inches long. It's important to roll gently but assertively—you don't want to rip the strands of gluten. Finish each rope by tapering about an inch on each end even more, to about 1/4" diameter.
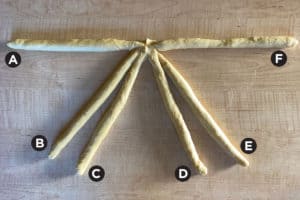
- Creating a six-strand braid: Clear a large countertop or work surface. Arrange the ropes, seam side down, like the diagram here, where it looks like a stick figure with no head, two arms, and four legs. Pinch all ropes together at the top middle spot. Keep the seam sides down as you do the braid.Take the left arm (A) and swing it down just to the left of the inside right leg (D). This rope becomes the new D. Now move the outside right leg (E) up to become the new right arm (A). Repeat on the left: bring the right arm (F) down just to the left of the inside left leg (C). This is now the new C. Move the outside left leg (B) up to become the new right arm (F). Repeat, starting with A as before. When you can't braid further, pinch the bottom ends tightly together and tuck underneath the loaf. The top ends were already pinched when you began. Pinch again and tuck underneath the loaf, pinching underneath to seal the tucked end to the underside.
- Move the finished loaf to one of the parchment-lined half-sheet pans and cover with plastic wrap.
- Wait 10-15 minutes, then shape the second loaf and set aside on the second parchment-lined half-sheet pan and cover with plastic wrap.

Final rise
- Let rise in a warm, draft-free place until it has become large and puffy, about 50% larger in volume. Check the rise every 30 minutes or so. This may take two hours even in a warm kitchen with this recipe. It's important to complete this final rise; otherwise the braids may pull apart too much in baking. (But also don't overproof, which can lead to flatter finished results.) The more you do this, the better sense you'll have of how long this process takes in your kitchen and you can leave it alone longer.
- In the last half hour of the final rise, preheat the oven to 350°F.
- Make the egg wash: beat the remaining egg in a small dish along with 1 teaspoon of water until it has a very even consistency. Just before baking, brush the egg wash all over the loaf, making sure there are no dry spots. Save the egg wash, as you'll be reapplying it during the bake.
Baking and cooling
- Bake in the center of the oven for 15 minutes, then take out and apply another egg wash.
- Optional: at this point you can add toppings such as poppy seeds, sesame seeds, everything bagel seasoning, etc. Sprinkle over the loaf after the egg wash.
- Return to the oven and bake another 15-20 minutes, until the top is deeply golden and an instant-read thermometer registers 190-200° in the thickest part. Another way to check doneness is to flip the loaf over and thump it with the back of a spoon. If it makes a hollow sound, the loaf is probably ready to take out of the oven. Slide off the parchment onto a cooling rack and let cool for at least an hour. It doesn't need to be completely cool before you slice into it, but it does finish its baking during that first hour of cooling.
- After the bread is completely cool, you can store it in a plastic bag for 3-4 days. For the prettiest slices, slice diagonally across the bumps.
Notes
Two notes on yeast:
- If you prefer to work with packets of active dry yeast, adjust the first steps as follows: start with the water at about 105°-115°F, then stir in 2 packets of active dry yeast and let stand about five minutes. Once the yeast is actively blooming, add the honey, butter, salt, and eggs and proceed as before. The rising time will be faster than indicated in the recipe.
- If you want a faster rise with the instant yeast and don't mind a yeastier taste, increase the amount of instant yeast to 16g. That should significantly speed up the rise, but there will be a distinctly yeasty taste to the final loaf.
- Start with room-temperature water instead of warm water. Don't add the yeast yet, but instead add the honey to the water. No need to mix yet.
- Melt 155g of butter over low heat. Add the melted butter to the water and honey and mix thoroughly. Add the yeast and stir in. Proceed as directed in the recipe.
Nutrition
Calories: 191kcal | Carbohydrates: 29g | Protein: 5g | Fat: 6g | Saturated Fat: 3g | Polyunsaturated Fat: 1g | Monounsaturated Fat: 2g | Trans Fat: 1g | Cholesterol: 45mg | Sodium: 338mg | Potassium: 54mg | Fiber: 1g | Sugar: 5g | Vitamin A: 188IU | Vitamin C: 1mg | Calcium: 12mg | Iron: 1mg